 Znet
ZnetInstall the App?
Getting Started
Your first steps with ZnetDK 4 Mobile
SUMMARY
Installing ZnetDK for Mobile
The installation of ZnetDK for Mobile lasts only a few minutes...
Prerequisite

ZnetDK for Mobile can be installed on any machine or web hosting having a web server (i.e. Apache, NGINX...) and PHP pre-installed.
For database access, MySQL is also required.
For development purpose, an Apache MySQL PHP package can be easily installed on your PC (Windows or Linux) or Apple computer (see list of AMP packages).
For writing the code of your application, you can use a simple text editor or a code editor like Notepad++.
However, for accelerating the development and debugging effectively your application, it's better to use an IDE like NetBeans or Eclipse.
Downloading ZnetDK for Mobile
Just go to the Download page on this website and download the latest version.
Once the download terminated, you get a ZIP archive named znetdk4m-vxx.zip containing the files to install on your computer or your hosting machine.
Deploying ZnetDK upon a web server
The deployment consists in extracting the downloaded ZIP archive znetdk4m-vxx.zip into the internet publication folder.
The folder where to publish the web application depends on your AMP package or your hosting provider.
Here are some common web root folders where to publish a website:
- WAMP:
C:\wamp\www\ - XAMPP:
C:\xampp\htdocs\ - Easy PHP:
C:\Program Files (x86)\EasyPHP-Devserver-17\eds-www\ - A Linux Hosting:
/var/www/ - Another Linux Hosting:
/home/www/
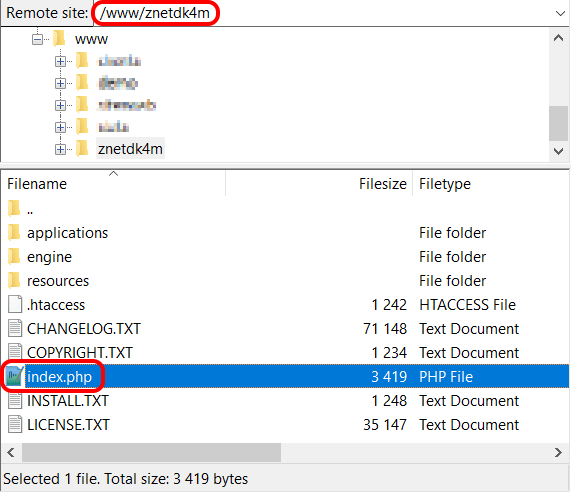
Once the ZIP archive content is extracted, you should have a subdirectory named znetdk4m.
If this subdirectory is not directly extracted into the target web root directory, so in this case move it to the right directory on your local filesystem.
If you can't extract your ZIP archive on your remote hosting storage space, then extract it locally on your computer and transfer it to the target web root directory using the FTP service of your hosting provider or a FTP software like FileZilla.
Write permissions granted to Apache
The Apache process needs write permissions for several ZnetDK 4 Mobile's directories to:
- Generate the
.htaccessfile intoINSTALL_DIR/directory for securing access to the web resources. - Write traces and data about logged in users in the
INSTALL_DIR/engine/log/directory, - Add the files uploaded by users in the
INSTALL_DIR/applications/default/documents/directory.
Displaying the starter Application
By now, open your web browser and enter in the address bar, the URL http://mydomain.net/znetdk4m/ to display the home page of the ZnetDK for Mobile Starter Application.
If you installed ZnetDK locally on your computer, then enter the URL http://localhost/znetdk4m/.
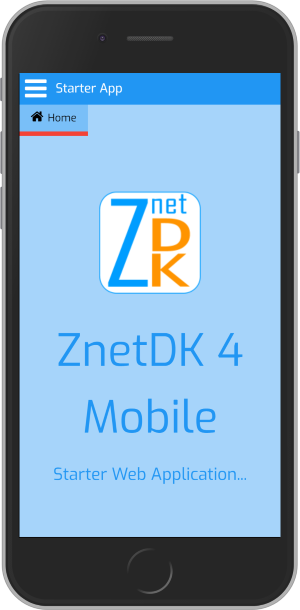
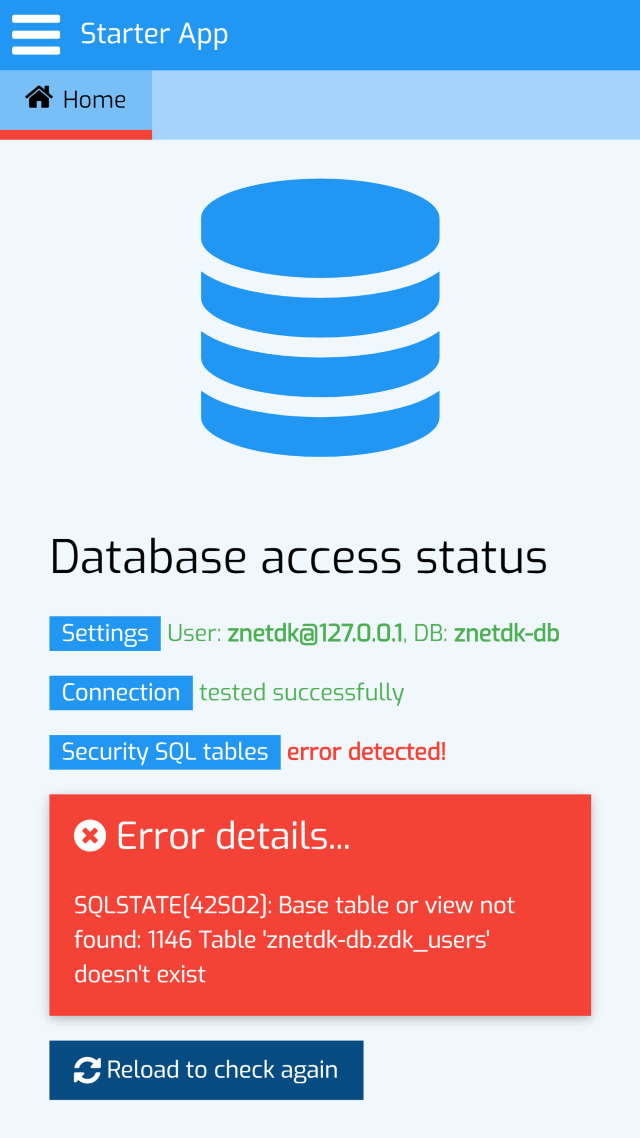
The Starter Application displays the home page as illustrated on the photo beside.
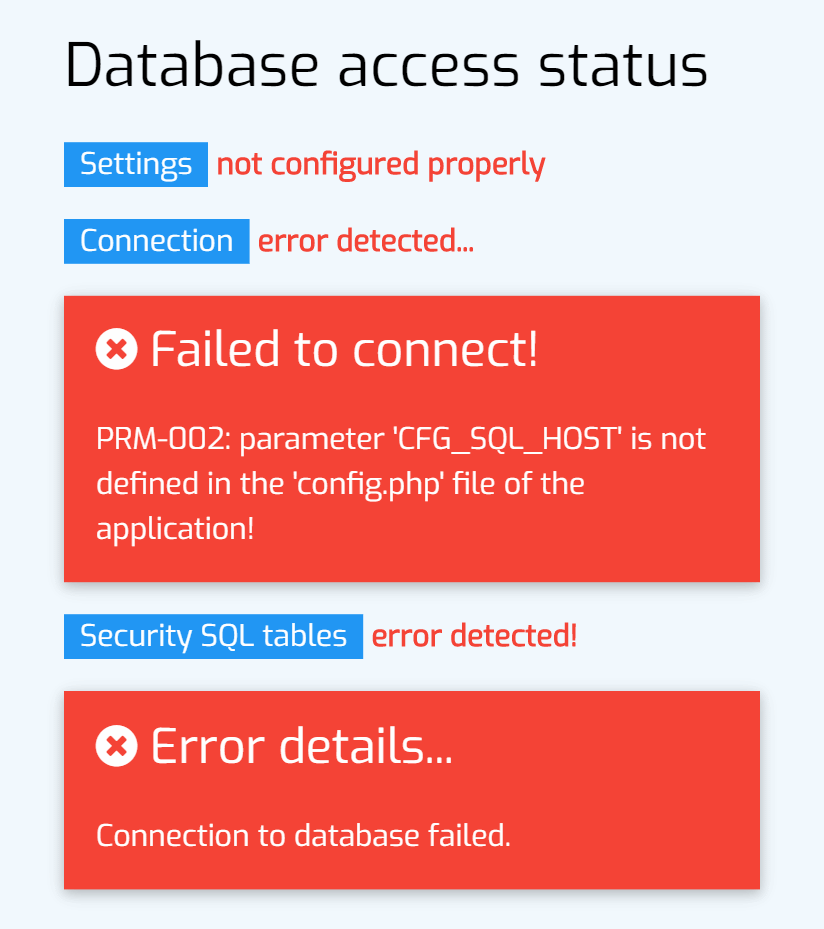
When you scroll down the home page, you can see some extra information about the database access status.
The following chapters will describe how to proceed to connect successfully and to install the SQL security tables.
It's now time for you to read the next chapter and customize your Starter Application...
Customizing the Starter Application
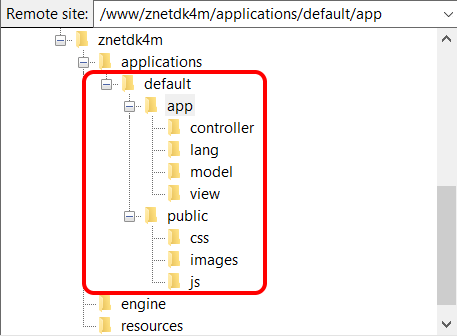
To customize the Starter Application, you're going to edit some PHP scripts that come with the installed ZnetDK 4 Mobile framework and that belong specifically to the default application.
The code of the applications you will develop is located into the applications/ subfolder, under the folder where ZnetDK is installed (for example /home/www/znetdk4m).
Several applications can be published within the INSTALL_DIR/applications/ subfolder.
Changing the titles of the application
To modify the titles of the Starter Application, edit the INSTALL_DIR/applications/default/app/lang/locale.php PHP script.
EXAMPLE: locale.php
define('LC_PAGE_TITLE', 'My page title');
EXAMPLE: locale.php
define('LC_HEAD_TITLE', 'My App title');
Setting the text displayed on the footer
The version number, the copyright and the Developed with ZnetDK
text displayed on the Starter App footer can be customized too.
EXAMPLE: locale.php
define('LC_FOOTER_LEFT', 'Version 2.0');
define('LC_FOOTER_CENTER', '<a href="http://mywebsite.org">My website</a>');
define('LC_FOOTER_RIGHT', '<b>Phone:</b> +33 678901234');
Setting the theme colors
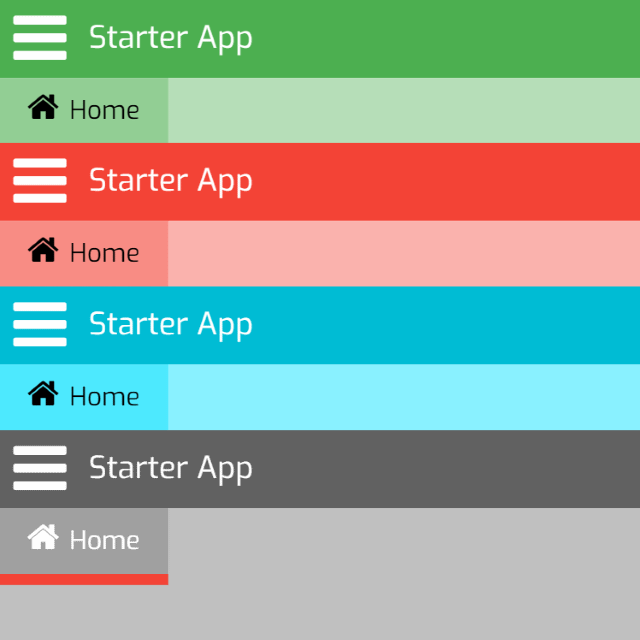
The ZnetDK for Mobile application UI was developed from the W3.CSS framework.
The default color theme applied to the Starter Application is the w3-theme-blue.
Browse and download the theme of your choice from the W3.CSS Color Themes page.
EXAMPLE: config.php
define('CFG_MOBILE_W3CSS_THEME','https://www.w3schools.com/lib/w3-theme-blue-grey.css');
Setting the theme font

The font set by default for the Starter Application is the Exo font coming from the Google Fonts.
EXAMPLE: config.php
define('CFG_MOBILE_CSS_FONT', 'https://fonts.googleapis.com/css?family=Raleway&display=swap');
define('CFG_MOBILE_CSS_FONT_FAMILY', "'Raleway', sans-serif");
Setting custom logos
The Starter Application ZnetDK logos can be replaced by your own logos.
The ZnetDK logos are displayed both in the left vertical menu and as the favicon of the application.
The left vertical menu logo
EXAMPLE: locale.php
define('LC_HEAD_IMG_LOGO', ZNETDK_APP_URI.'images/mylogo.jpg');
ZNETDK_APP_URI is a PHP constant containing the URI of the application.
The favicon logo
EXAMPLE: custom PHP script mobile_favicons.php
<link rel="apple-touch-icon" sizes="180x180" href="<?php echo $faviconDir; ?>apple-touch-icon.png">
<link rel="icon" type="image/png" sizes="32x32" href="<?php echo $faviconDir; ?>favicon-32x32.png">
<link rel="icon" type="image/png" sizes="16x16" href="<?php echo $faviconDir; ?>favicon-16x16.png">
<link rel="manifest" href="<?php echo $faviconDir; ?>site.webmanifest">
<link rel="mask-icon" href="<?php echo $faviconDir; ?>safari-pinned-tab.svg" color="#5bbad5">
<link rel="shortcut icon" href="<?php echo $faviconDir; ?>favicon.ico">
<meta name="msapplication-TileColor" content="#ffc40d">
<meta name="msapplication-config" content="<?php echo $faviconDir; ?>browserconfig.xml">
<meta name="theme-color" content="#ffffff">
EXAMPLE: custom file site.webmanifest
{
  "name": "My custom APP",
  "short_name": "My APP",
  "description": "The description of my custom APP",
  "start_url": "../../../../../",
  "icons": [
    {
      "src": "android-chrome-192x192.png",
      "sizes": "192x192",
      "type": "image/png"
    },
    {
      "src": "android-chrome-256x256.png",
      "sizes": "256x256",
      "type": "image/png"
    },
    {
      "src": "android-chrome-512x512.png",
      "sizes": "512x512",
      "type": "image/png"
    }
  ],
  "theme_color": "#ffffff",
  "background_color": "#ffffff",
  "display": "standalone"
}
EXAMPLE: config.php
define('CFG_MOBILE_FAVICON_DIR', 'applications/' . ZNETDK_APP_NAME .'/public/images/favicons');
define('CFG_MOBILE_FAVICON_CODE_FILENAME', 'applications/' . ZNETDK_APP_NAME . '/app/layout/mobile_favicons.php');
ZNETDK_APP_NAME is a PHP constant containing the value 'default'.
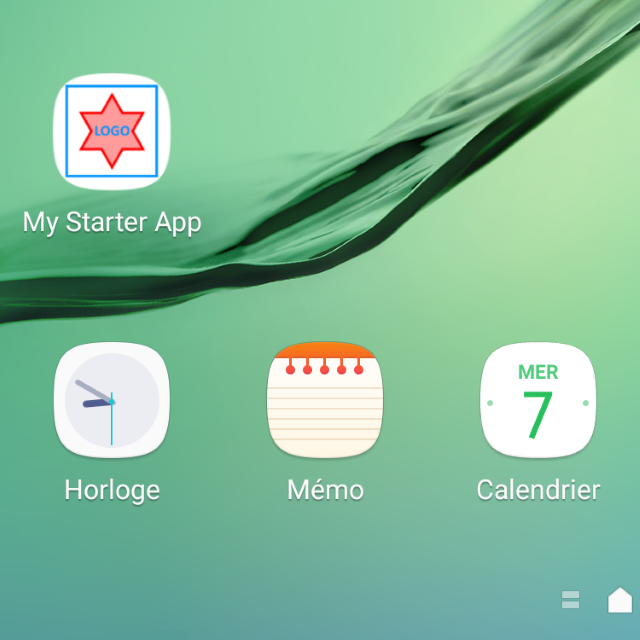
Now, you can add a shortcut icon for the application on the Home Screen of your mobile phone or tablet and see your custom favicon.
Adding new views and menu entries
In this chapter, you will see how to add additional views to your Starter Application and how to display them when clicking on new navigation menu items.
New views
A view is a script written in HTML5 and in PHP whose content is intended to be displayed in the application.
A view is usually added to the application to display an input form, a list of data, a dashboard, a calendar, graphics, a photo album, documentation, etc.
The view content is displayed when the user clicks on a menu item.
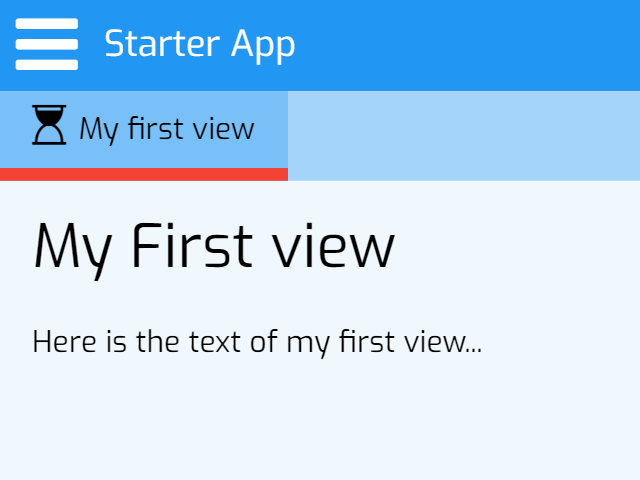
EXAMPLE: myview1.php
<h2>My First view</h2>
<p>Here is the text of my first view...</p>
EXAMPLE: myview2.php
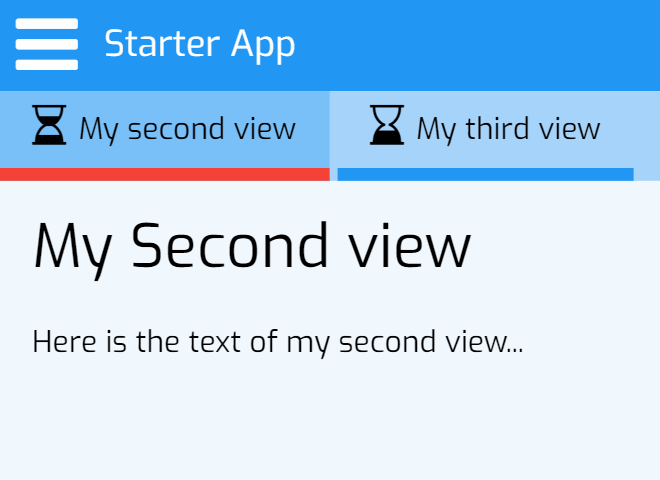
<h2>My Second view</h2>
<p>Here is the text of my second view...</p>
EXAMPLE: myview3.php
<h2>My Third view</h2>
<p>Here is the text of my third view...</p>
To display these views, we need now to tie them to the navigation menu as explain in the next chapter.
New menu items
Navigation in the application is provided by the left vertical menu and the horizontal menu above the displayed view.
The left vertical menu displays the Level one menu items while the horizontal menu displays the Level two menu items.
EXAMPLE: menu.php
static public function initAppMenuItems() {
    \MenuManager::addMenuItem(NULL, 'home', 'Home', 'fa-home');

    \MenuManager::addMenuItem(NULL, 'myview1', 'My first view', 'fa-hourglass-1');
    \MenuManager::addMenuItem(NULL, '_myotherviews', 'My other views', 'fa-hourglass');
    \MenuManager::addMenuItem('_myotherviews', 'myview2', 'My second view', 'fa-hourglass-2');
    \MenuManager::addMenuItem('_myothesviews', 'myview3', 'My third view', 'fa-hourglass-3');

    \MenuManager::addMenuItem(NULL, '_authorizations', LC_MENU_AUTHORIZATION, 'fa-unlock-alt');
    \MenuManager::addMenuItem('_authorizations', 'z4musers', LC_MENU_AUTHORIZ_USERS, 'fa-user');
    \MenuManager::addMenuItem('_authorizations', 'z4mprofiles', LC_MENU_AUTHORIZ_PROFILES, 'fa-key');
}
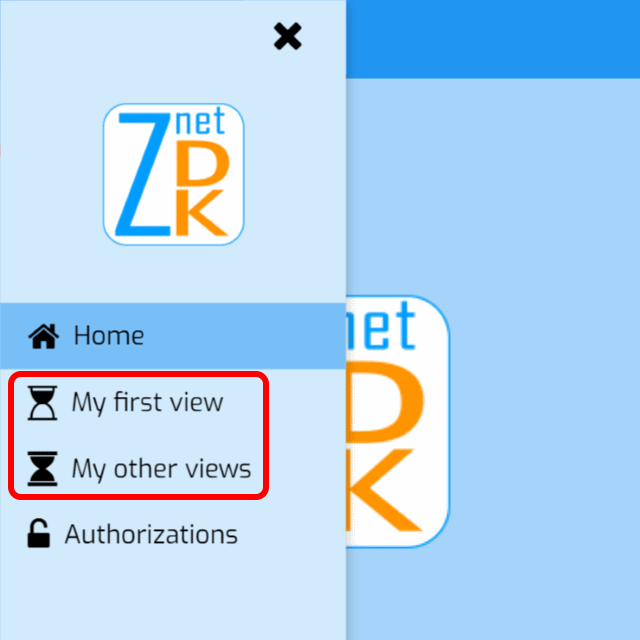
Now if you refresh the display of the application in your web browser and then click on the menu button ( ) on the top left of the screen, you should see 2 new menu items within the left vertical menu.
Connecting to a Database
This chapter describes the way to configure the Starter Application for connecting it to a local or remote MySQL database.
The database features
The database is a MySQL or MariaDB database created with the utf8_unicode_ci characterset.
The database user must have all the necessary privileges to connect to the database (locally or remotely as needed) and to SELECT, INSERT, UPDATE, and DELETE rows from the database tables.
Configuring the Application
Edit the INSTALL_DIR/applications/default/app/config.php script then uncomment and modify the following constant values.
EXAMPLE: config.php
define('CFG_SQL_HOST', '127.0.0.1');
define('CFG_SQL_PORT', NULL);
define('CFG_SQL_APPL_DB', 'znetdk-db');
define('CFG_SQL_APPL_USR', 'znetdk');
define('CFG_SQL_APPL_PWD', 'password');
Checking the connection
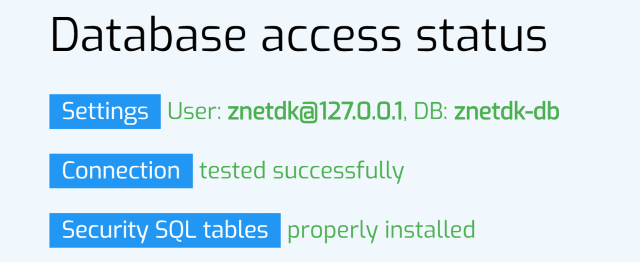
Once you configured the connection to the database, return to the home view of the Starter Application to check the connection status.
Click on the Reload to check again button to reload the home view after any change of the database connection settings.
Ignore for the moment the error concerning the Security SQL tables. It means that SQL tables are missing. You will see how to add these tables in the next chapter.
Enabling user authentication
You will see in this chapter how to install the Security SQL Tables, how to declare the users of the Startup Application and then, how to enable the login form for authenticating them.
Installing the Security SQL Tables
The Security SQL tables are required to store user informations, credentials and profiles.
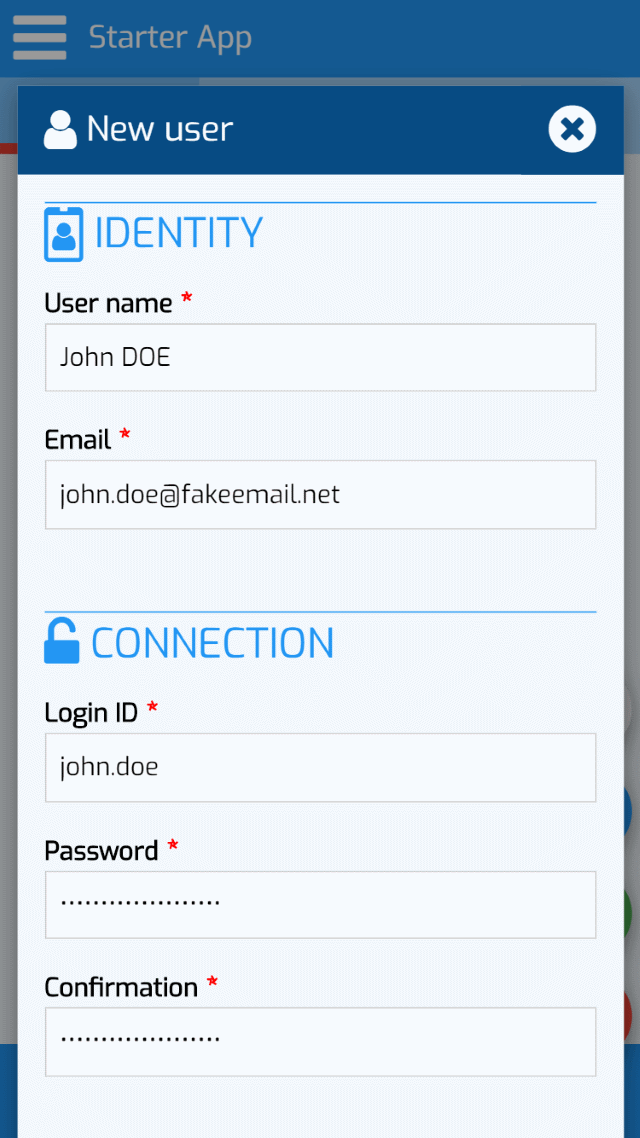
Declaring users
If you want to restrict the user's access to a subset of navigation menu items, create first a user profile in which only those menu items are selected.
Then, when you register the user, select the user profile that you just created and this time, the Full Menu access option should be left unchecked.
Configuring user authentication
When you install ZnetDK for Mobile, the embedded Starter Application is not configured by defaut for displaying the login form.
EXAMPLE: config.php
define('CFG_AUTHENT_REQUIRED',TRUE);
Checking user authentication
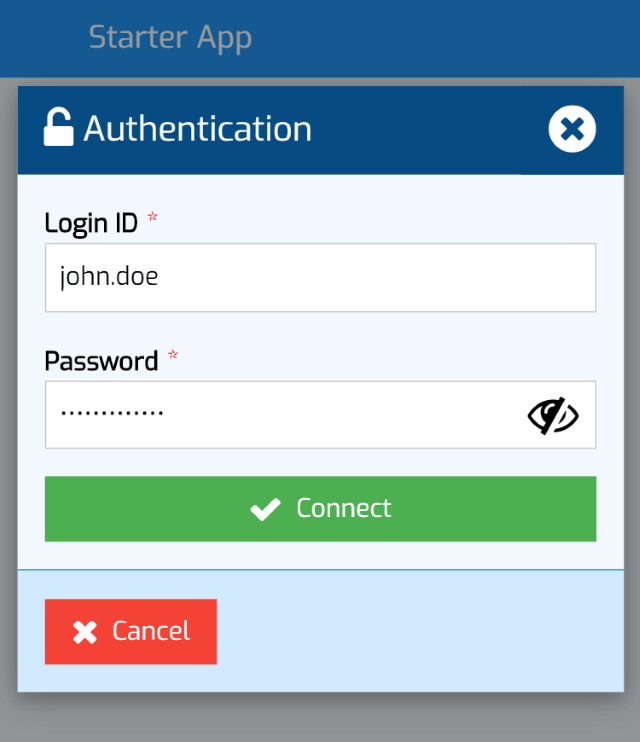
It is now time to log in to the application with the previously registered user account.
With authentication now enabled, reload the Starter application in the web browser to display the login form.
Enter the credentials of the previously created user. The application now can be only used by authenticated users.
Going further...
Congratulations! You have successfully customized and configured your Starter Application. You are ready to develop your business features in PHP and JavaScript.
To manage a list of contacts with your Starter Application, I invite you to read the Tutorial on this website.
Nevertheless, if you have trouble installing, customizing or developing your first application, feel free to post your questions, comments or feedback on the official ZnetDK Forum.