 Znet
ZnetInstall the App?
Tutorial
Learning how to add a contact list to your web application
What you will develop...
You will learn in the first part of this tutorial, how to display within a PHP view, a list of contacts stored in a MySQL database.
Then, at the end of the fourth part of the tutorial, you'll be able to add new contacts to the list, to edit existing ones, to search for contacts and to delete a contact.
Prerequisite...
Before starting this tutorial, be sure to get the ZnetDK for Mobile Starter Application installed and configured to access to a MySQL database.
Otherwise, go to the Get Started Page and follow the procedure indicated.
SUMMARY
PART 1 - Displaying a contact list
In this chapter, you will add a new table contacts to the web application database and then a PHP view contactlist.php to the application.
This first part only requires knowledge in PHP and HTML.
Creating the SQL table
First, download the zdk4m-tuto-contacts.sql Tutorial SQL script from the Download page.
Next, log in to your phpMyAdmin tool with a user account allowed to create a new table and to insert rows into the web application datatable.
Finally, import the downloaded zdk4m_tuto_contacts.sql script into your web application database.
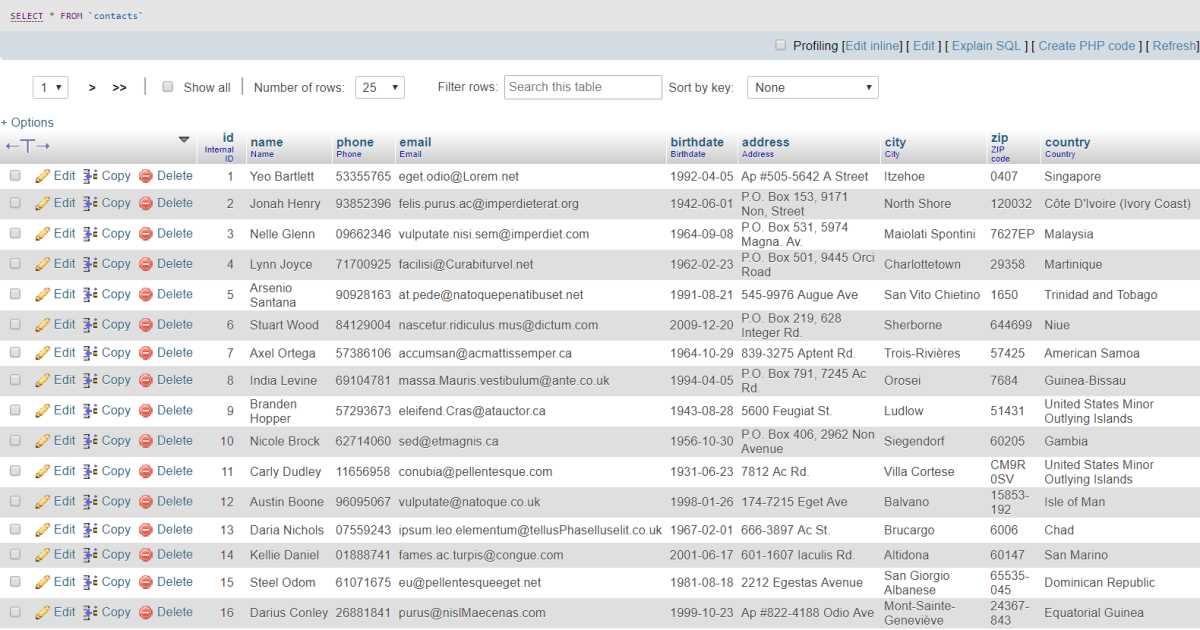
Once import terminated, you should see a new table named contacts containing 100 sample rows as shown on the picture beside.
Adding the "My contacts" item to the navigation menu
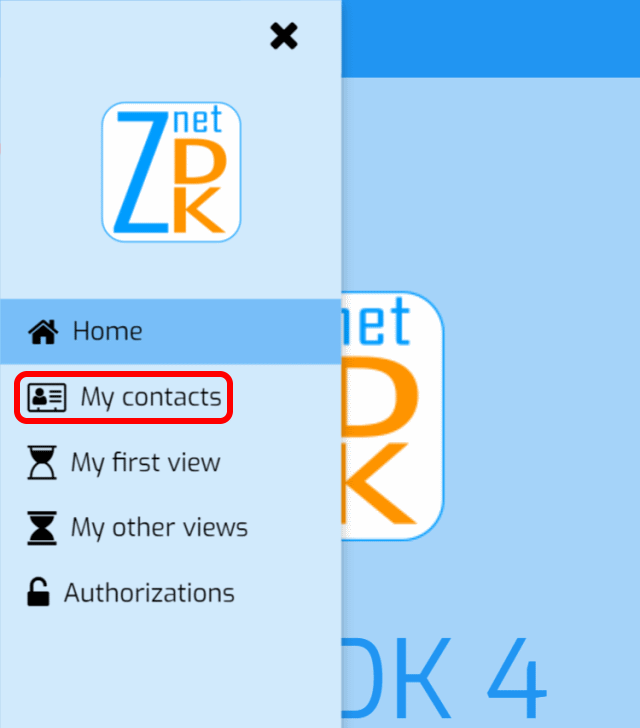
To display the contactlist.php view, a new menu item named My contacts
is added to the navigation menu by editing the INSTALL_DIR/applications/default/app/menu.php script.
Insert the line #3 below just after the definition of the Home
menu.
TUTORIAL: menu.php
\MenuManager::addMenuItem(NULL, 'home', 'Home', 'fa-home');

\MenuManager::addMenuItem(NULL, 'contactlist', 'My contacts', 'fa-address-card-o');

\MenuManager::addMenuItem(NULL, 'myview1', 'My first view', 'fa-hourglass-1');
Each call to the ZnetDK \MenuManager::addMenuItem() method adds a new item to the navigation menu and connect it to the view to display.
The parameters passed to the method are explained below:
NULL: this NULL value indicates that the item is to display as a root menu item.'contactlist': this is the name of the PHP view (without the.phpextension) to display when the user clicks on the menu item.'My contacts': the label displayed for the menu item on the navigation menu.'fa-address-card-o': the name of the Font Awesome icon to display for the menu item on the navigation menu.
Now, reload the application into your web browser to display the My contacts
menu item.
Creating the PHP view
To begin, add a new PHP script named contactlist.php into the INSTALL_DIR/applications/default/app/view/ folder of the Starter Application then copy and paste the following code.
TUTORIAL: contactlist.php
<?php
    $contactsDao = new SimpleDAO('contacts');
    $rowsFound = array();
    $rowCount = $contactsDao->getRows($rowsFound, 'name');
?>
<h3><?php echo "{$rowCount} contacts found:"; ?></h3>
<ul class="w3-ul w3-border">
<?php foreach ($rowsFound as $row) : ?>
    <li>
        <b><?php echo $row['name']; ?></b>
        <a class="w3-right" href="tel:<?php echo $row['phone']; ?>">
            <i class="w3-text-theme fa fa-phone-square fa-lg"></i>
            <span style="font-family: monospace;"><?php echo $row['phone']; ?></span>
        </a>
    </li>
<?php endforeach; ?>
</ul>
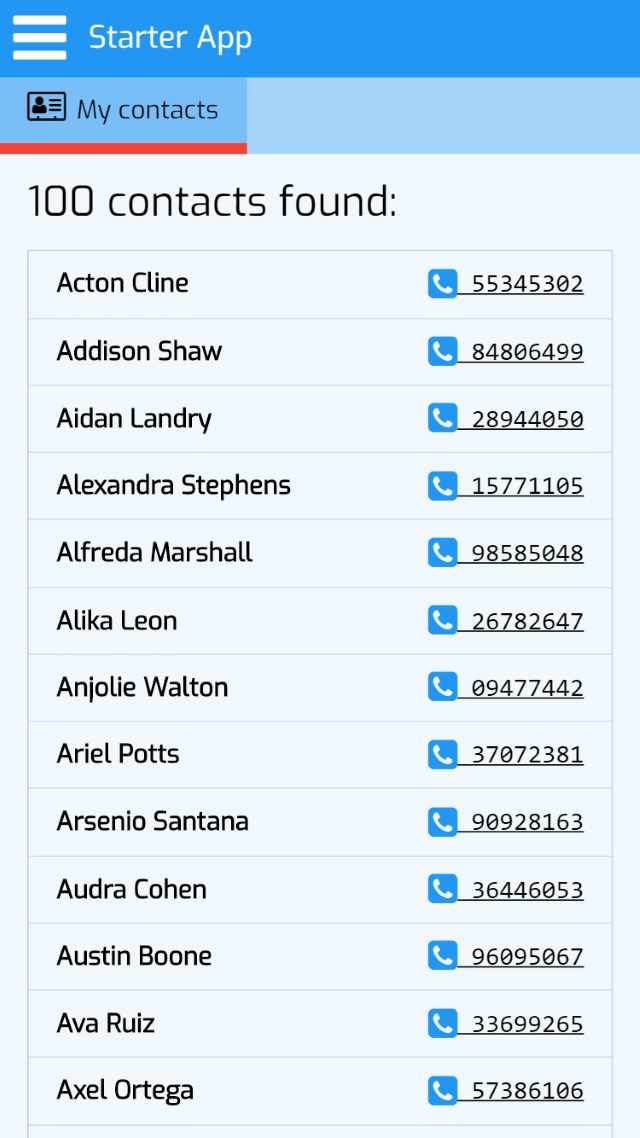
This code is a simple and usual way in PHP to display data rows in a HTML view.
The first 3 lines of code in the view are written in PHP.
They consist in extracting the data rows from the contacts database table thanks to the ZnetDK SimpleDAO class.
The rows of contacts are assigned to the $rowsFound variable by the SimpleDAO::getRows() method which further sorts the returned rows by name.
The next lines of PHP code iterate over the table rows (foreach loop) in order to display them within a HTML unordered list (ul HTML tag).
Only the values of the name and phone columns of the contacts table are displayed.
Finally, the w3-ul, w3-border, w3-right and w3-text-theme W3.CSS classes help to style a minimum the HTML list.
PART 2 - Adding and editing contacts
This chapter presents another solution to display the list of contacts, in particular based on AJAX requests, JavaScript code and the ZnetDK for Mobile framework.
This solution is particularly suitable for displaying a large number of data rows by loading them on demand using an infinite scroll mechanism.
At last, this second part shows how to add and edit contacts.
Adding a controller to the application
According to the MVC design pattern, we will add the contactctrl.php application controller to handle the AJAX requests sent by the view.
The contactctrl.php controller is a PHP script added to the INSTALL_DIR/applications/default/app/controller/ folder.
This script contains the definition of the PHP class ContactCtrl consisting of 3 methods, each one matching a specific controller action.
The 3 actions of the controller are:
action_all(): method called by the view to get the 20 next data rows to display.action_detail(): called to retrieve the data of a given contact for editing purposes.action_store(): action called to store a new contact or to update the data of an existing one.
These controller actions use the SimpleDAO class again to manipulate the data in the contacts MySQL table.
Here is below the PHP code of the contactctrl.php script.
TUTORIAL: contactctrl.php controller script
<?php
namespace app\controller;
class ContactCtrl extends \AppController {
    static protected function action_all() {
        $response = new \Response();
        $contacts = array();
        $dao = new \SimpleDAO('contacts');
        $response->total = $dao->getRows($contacts, 'id');
        $response->rows = $contacts;
        return $response;
    }
    static protected function action_detail() {
        $request = new \Request();
        $dao = new \SimpleDAO('contacts');
        $detail = $dao->getById($request->id);
        $response = new \Response();
        $response->setResponse($detail === FALSE ? array() : $detail);
        return $response;
    }
    static protected function action_store() {
        $request = new \Request();
        $formData = $request->getValuesAsMap('id', 'name', 'birthdate',
                'address', 'zip', 'city', 'country', 'phone', 'email');
        $dao = new \SimpleDAO('contacts');
        $contactId = $dao->store($formData);
        $response = new \Response();
        $response->setSuccessMessage('Contact',
                "Storage of the contact with ID={$contactId} succeeded.");
        return $response;
    }
}
?>
A controller action returns its response in JSON format thanks to a ZnetDK \Response object.
The POST parameters of the AJAX request are read by the controller action by instantiating a ZnetDK \Request object.
The view - Displaying contacts from AJAX request
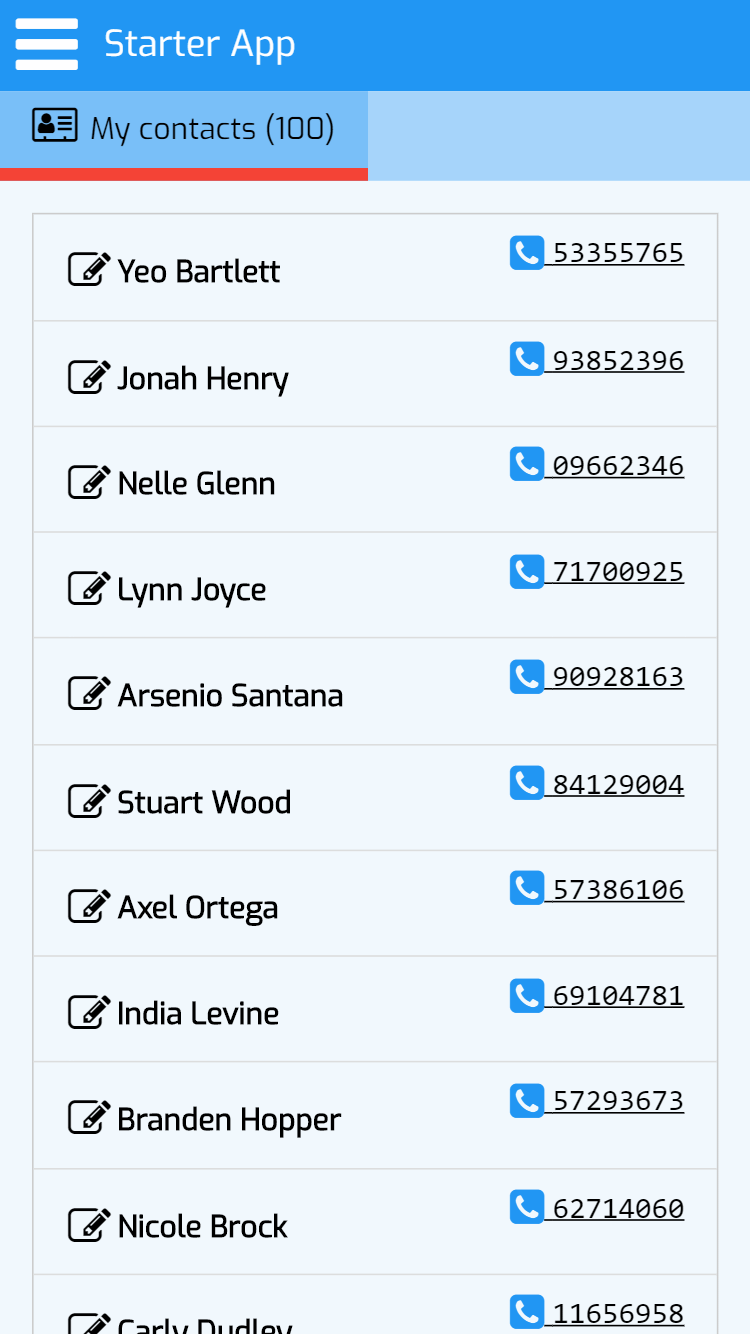
In this chapter, we will replace the contactlist.php view code written in PART 1 of this tutorial, by new code based on the ZnetDK for Mobile framework.
This new version of the view has the advantage of only loading on demand a subset of contacts (infinite scroll
), unlike the previous version that loaded all the contacts into the view at one time.
Here is the new code of the view.
TUTORIAL PART 2: contactlist.php, ZnetDK Data List implementation
<ul id="contactlist" class="w3-ul w3-border w3-margin-top w3-hide"
    data-zdk-load="contactctrl:all">
    <li data-id="{{id}}">
        <a class="edit w3-xlarge"><i class="fa fa-edit fa-lg"></i></a>
        <b>{{name}}</b>
        <a class="w3-right" href="tel:{{phone}}">
            <i class="w3-text-theme fa fa-phone-square fa-lg"></i>
            <span style="font-family: monospace;">{{phone}}</span>
        </a>
    </li>
</ul>
<script>
    var myContactList = znetdkMobile.list.make('#contactlist', false, false);
</script>
As you can see, there is no PHP code in this new version of the view.
It means that the HTML list is no longer built by the Web server before being downloaded.
The view - Adding an input form for creating and editing contacts
Now, we will add to the contactlist.php view, the definition in HTML of the input form used for editing the information of an existing contact and for adding new contacts.
Here is the new code of the view including the input form implementation.
TUTORIAL PART 2: contactlist.php, the input form
<!-- LIST OF CONTACTS -->
<ul id="contactlist" class="w3-ul w3-border w3-margin-top w3-hide"
    data-zdk-load="contactctrl:all">
    <li data-id="{{id}}">
        <a class="edit w3-xlarge"><i class="fa fa-edit fa-lg"></i></a>
        <b>{{name}}</b>
        <a class="w3-right" href="tel:{{phone}}">
            <i class="w3-text-theme fa fa-phone-square fa-lg"></i>
            <span style="font-family: monospace;">{{phone}}</span>
        </a>
    </li>
</ul>
<!-- CONTACT INPUT FORM -->
<div id="contact-modal" class="w3-modal">
    <div class="w3-modal-content w3-card-4">
        <header class="w3-container w3-theme-d5">
            <a class="close w3-button w3-xlarge w3-hover-theme w3-display-topright" href="javascript:void(0)" aria-label="<?php echo LC_BTN_CLOSE; ?>">
                <i class="fa fa-times-circle fa-lg" aria-hidden="true" title="<?php echo LC_BTN_CLOSE; ?>"></i>
            </a>
            <h4 class="title">Contact</h4>
        </header>
        <form class="w3-container w3-theme-light" data-zdk-load="contactctrl:detail"
                data-zdk-submit="contactctrl:store">
            <input type="hidden" name="id">
            <div class="w3-section">
                <label><b>Name</b> <i class="fa fa-asterisk w3-text-red" aria-hidden="true"></i>
                    <input class="w3-input w3-border w3-margin-bottom" type="text" name="name" autocomplete="name" required>
                </label>
                <label>
                    <b>Birthdate</b>
                    <input class="w3-input w3-border w3-margin-bottom" type="date" name="birthdate">
                </label>

                <label>
                    <b>Address</b>
                    <input class="w3-input w3-border w3-margin-bottom" type="text" name="address" autocomplete="street-address">
                </label>
                <label>
                    <b>ZIP</b>
                    <input class="w3-input w3-border w3-margin-bottom" type="text" name="zip" autocomplete="postal-code">
                </label>
                <label>
                    <b>City</b>
                    <input class="w3-input w3-border w3-margin-bottom" type="text" name="city">
                </label>
                <label>
                    <b>Country</b>
                    <input class="w3-input w3-border w3-margin-bottom" type="text" name="country" autocomplete="country">
                </label>
                <label>
                    <b>Phone</b>
                    <input class="w3-input w3-border w3-margin-bottom" type="text" name="phone" autocomplete="tel">
                </label>
                <label>
                    <b>Email</b>
                    <input class="w3-input w3-border" type="email" name="email" autocomplete="email">
                </label>
                <button class="w3-button w3-block w3-green w3-section w3-padding" type="submit"><i class="fa fa-save"></i> <?php echo LC_BTN_SAVE; ?></button>
            </div>
        </form>
    </div>
</div>
<script>
    // The list of contacts is generated
    var myContactList = znetdkMobile.list.make('#contactlist', false, false);
    // The contact input form is linked to the list
    myContactList.setModal('#contact-modal', true, function(){ // NEW
        this.setTitle('New contact');
    }, function(formObject) { // EDIT
        var contactId = formObject.getInputValue('id');
        this.setTitle('Edit contact #' + contactId);
    });
</script>
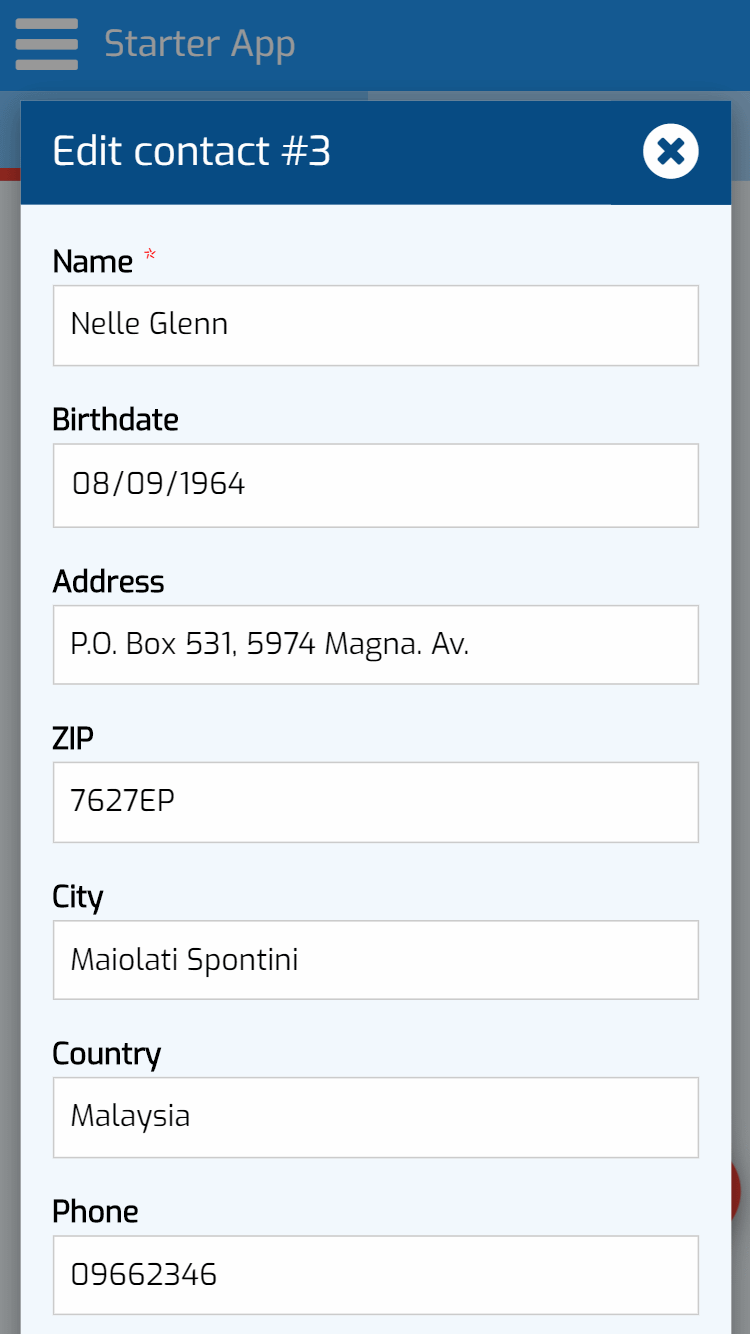
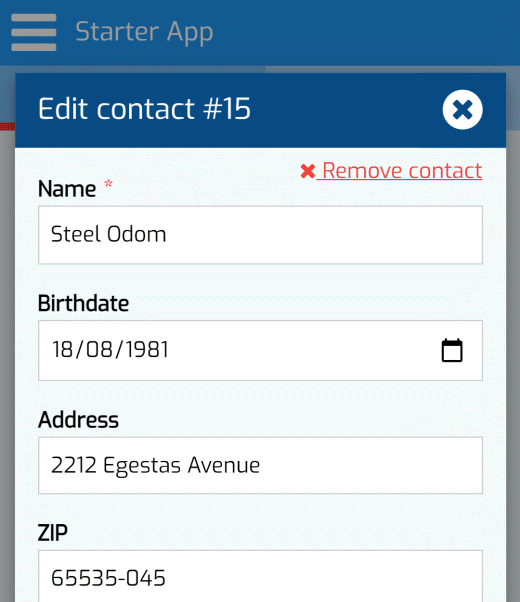
If we look now at the HTML source code of the input form, we can notice that the <form> element is surrounded by a <div> element having the w3-modal CSS class.
Indeed, the form is displayed in a modal dialog as shown on the picture below.
On the other hand, you can see the data-zdk-load="contactctrl:detail" attribute of the form element that indicates to the ZnetDK framework, the controller action to call for getting the information of a given contact to edit.
According to the same principle, the data-zdk-submit="contactctrl:store" attribute indicates the controller action to call on form submit.
About the Javascript source code, a call to the setModal() method on the myContactList ZnetDK object specifies the modal dialog to display (matching the '#contact-modal' selector) when editing a contact and when adding a new contact.
Two callback methods are passed in parameters of the setModal() method to customize the title of the modal dialog when adding and editing a contact.
To see the new version of the view in action, click on the red Plus button (+ at the bottom right of the list) to display the new contact form. Once filled in, click on the Save button to store the new contact.
To modify an existing contact, click on the Edit icon () from the list, change data in the form and save by clicking on the Save button.
The view - Styling the contact list
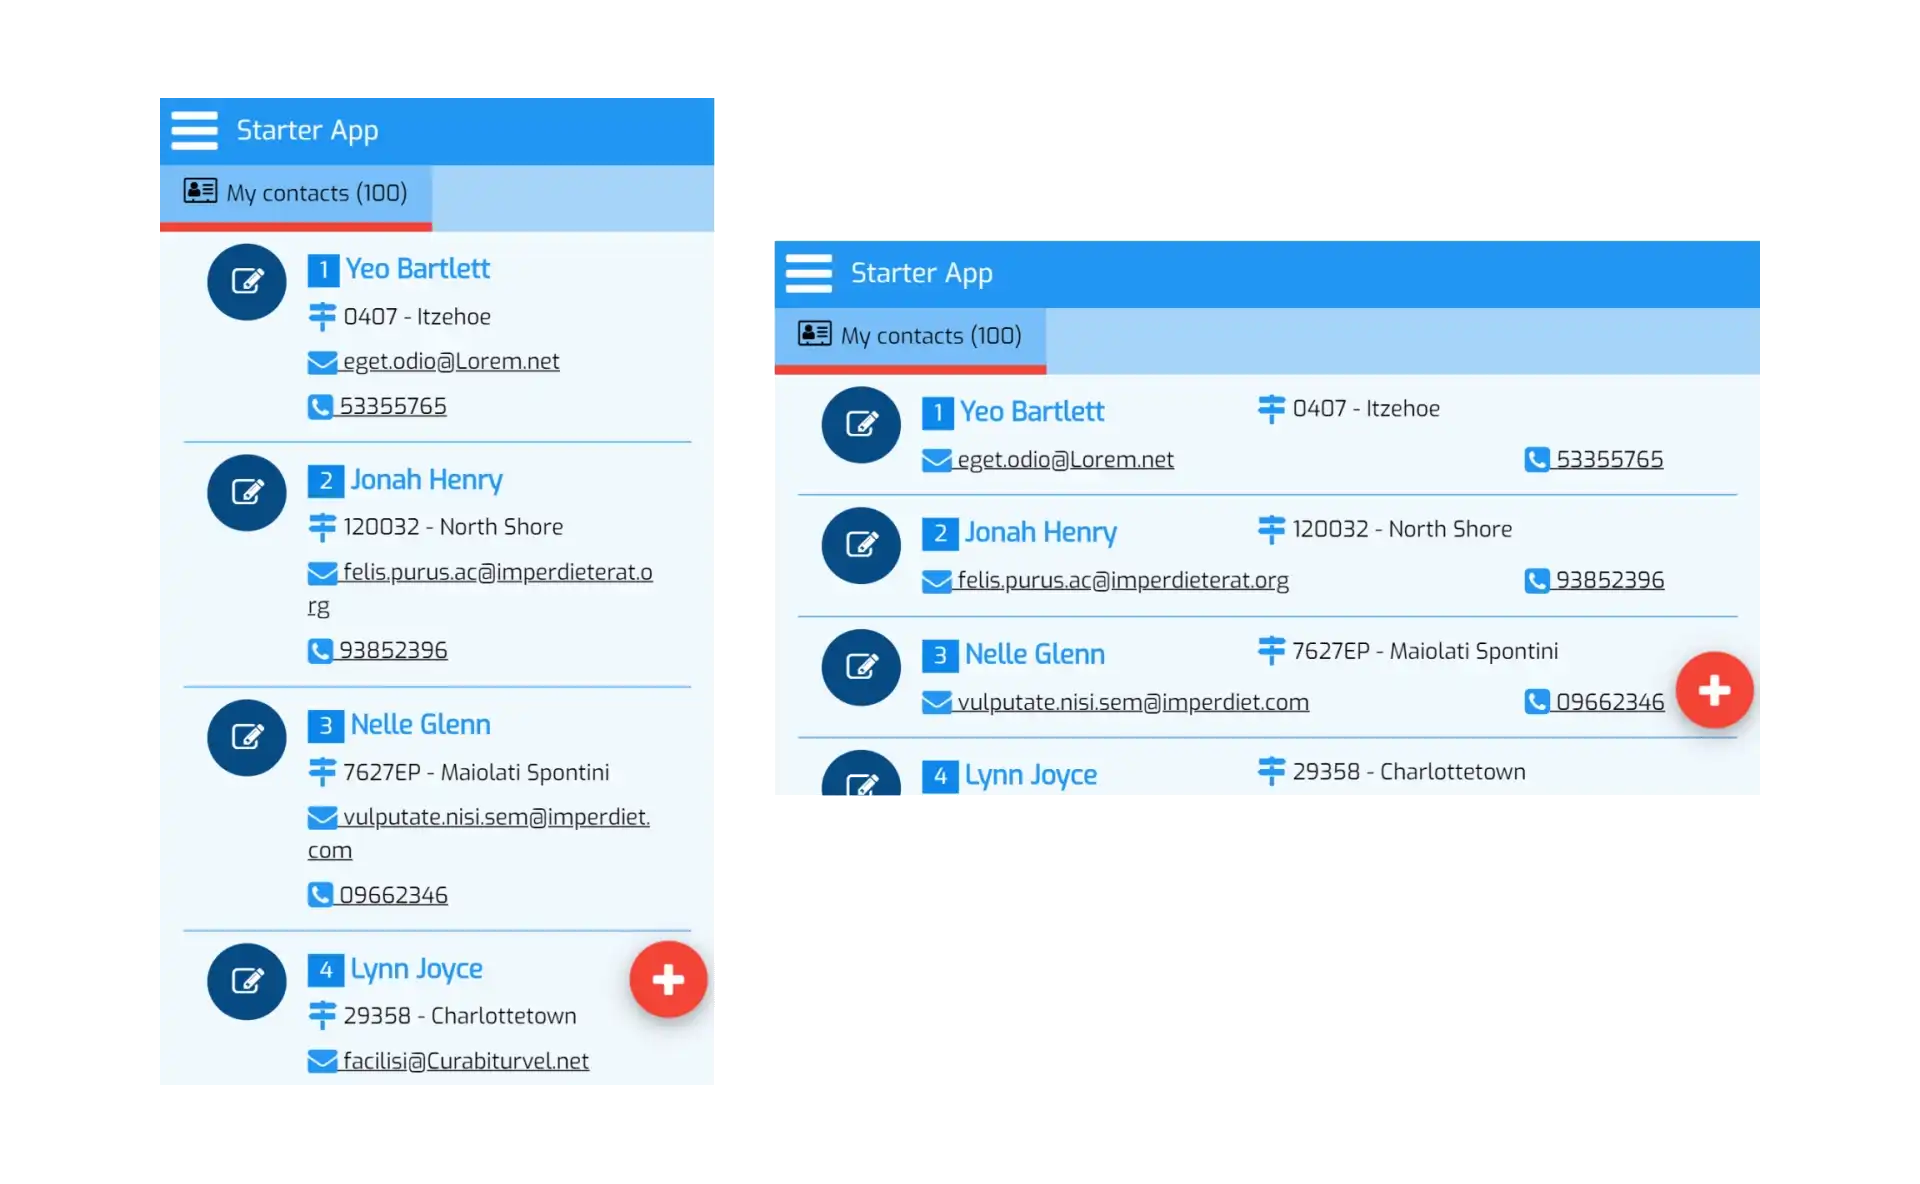
Finally, we will display additional information for each contact in the list while ensuring their optimal readability regardless of the dimensions of the screen.
To do this, simply apply the W3.CSS responsive grid style classes for an adaptive display based on the size of the viewport.
See below the new HTML code of the list of contacts.
TUTORIAL PART 2: contactlist.php, styles of the contact list
<!-- LIST OF CONTACTS -->
<ul id="contactlist" class="w3-ul w3-hide"
    data-zdk-load="contactctrl:all">
    <li class="w3-border-theme" data-id="{{id}}">
        <div class="w3-row">
            <div class="w3-col" style="width: 60px;">
                <a class="edit w3-button w3-circle w3-ripple w3-xlarge w3-theme-action w3-hover-theme"><i class="fa fa-edit"></i></a>
            </div>
            <div class="w3-rest w3-row">
                <div class="w3-col s12 m5 l3 w3-padding-small">
                    <span class="w3-tag w3-theme-d1">{{id}}</span>
                    <span class="w3-text-theme w3-large"><strong>{{name}}</strong></span>
                </div>
                <div class="w3-col s12 m7 l3 w3-padding-small">
                    <i class="w3-text-theme fa fa-map-signs fa-lg"></i> <span>{{zip}} - {{city}}</span>
                </div>
                <div class="w3-col s12 m9 l4 w3-padding-small">
                    <a href="mailto:{{email}}">
                        <i class="w3-text-theme fa fa-envelope fa-lg"></i> <span>{{email}}</span>
                    </a>
                </div>
                <div class="w3-col s12 m3 l2 w3-padding-small">
                    <a href="tel:{{phone}}">
                        <i class="w3-text-theme fa fa-phone-square fa-lg"></i> <span>{{phone}}</span>
                    </a>
                </div>
            </div>
        </div>
    </li>
</ul>
As shown in the screenshot below, the contact list display automatically adjusts according to the screen orientation.
PART 3 - Searching for contacts
In this chapter, you will see how to add an additional action button to search for contacts whose name matches a keyword entered by the user.
The view - Adding search button and keyword input
TUTORIAL PART 3: contactlist.php, enabling Data List search feature
<script>
    // The list of contacts is generated
    var myContactList = znetdkMobile.list.make('#contactlist', false, true);
    // The contact input form is linked to the list
    myContactList.setModal('#contact-modal', true, function(){ // NEW
        this.setTitle('New contact');
    }, function(formObject) { // EDIT
        var contactId = formObject.getInputValue('id');
        this.setTitle('Edit contact #' + contactId);
    });
</script>
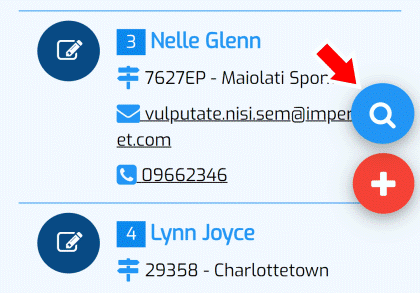
Now, if you reload the app in the web browser, a new blue search button will appear just above the Add button.
When clicking on the search button, a modal dialog is displayed with a search field.
TUTORIAL PART 3: contactlist.php, connecting the search field to a remote controller
<!-- LIST OF CONTACTS -->
<ul id="contactlist" class="w3-ul w3-hide"
    data-zdk-load="contactctrl:all"
    data-zdk-autocomplete="contactctrl:suggestions">
    <li class="w3-border-theme" data-id="{{id}}">
        <!-- The rest of the HTML code... -->
    </li>
</ul>
The implementation of the controller action specified for data-zdk-autocomplete is described in the next chapter.
The controller - Searching for contacts by name
Now, the action_all() method only returns the contacts whose name matches the keyword entered.
TUTORIAL PART 3: contactctrl.php, specifying the name column where to search in.
static protected function action_all() {
    $response = new \Response();
    $contacts = array();
    $dao = new \SimpleDAO('contacts');
    $dao->setKeywordSearchColumn('name');
    $response->total = $dao->getRows($contacts, 'id');
    $response->rows = $contacts;
    return $response;
}
TUTORIAL PART 3: contactctrl.php, getting search suggestions
static protected function action_suggestions() {
    $dao = new \SimpleDAO('contacts');
    $dao->setKeywordSearchColumn('name');
    $suggestions = $dao->getSuggestions();
    $response = new \Response();
    $response->setResponse($suggestions);
    return $response;
}
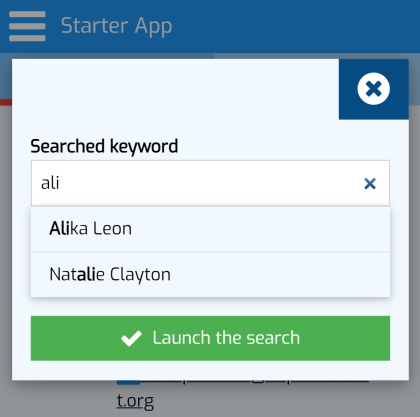
The search for suggestions from the keyword is performed by a call to the \SimpleDAO::getSuggestions() method.
As for the action_all() method, the column of the contacts table in which to search for suggestions is also indicated by a call to the \SimpleDAO::setKeywordSearchColumn() method.
The search can be launched several times. In this case, the criteria are applied cumulatively.
A search criterion is deleted by clicking on the close icon to the left of the criterion's blue label.

PART 4 - DELETING A CONTACT
The view - Adding a link to the input form to delete the contact
TUTORIAL PART 4: contactlist.php, HTML link to remove the contact
<div id="contact-modal" class="w3-modal">
    <div class="w3-modal-content w3-card-4">
        <header class="w3-container w3-theme-d5">
            <span class="close w3-button w3-xlarge w3-hover-theme w3-display-topright"><i class="fa fa-times-circle fa-lg"></i></span>
            <h4 class="title">Contact</h4>
        </header>
        <form class="w3-container w3-theme-light" data-zdk-load="contactctrl:detail"
             data-zdk-submit="contactctrl:store">
            <input type="hidden" name="id">
            <div class="w3-section w3-display-container">
                <a class="remove w3-text-red w3-display-right" href="#"><i class="fa fa-close"></i> Remove contact</a>
            </div>
            <div class="w3-section">
                <label class="zdk-required"><b>Name</b></label>
                <input class="w3-input w3-border w3-margin-bottom" type="text" name="name" required>
                <!-- Rest of the form definition... -->
            </div>
        </form>
    </div>
</div>
TUTORIAL PART 4: contactlist.php, show / hide removal HTML link
<script>
    var myContactList = znetdkMobile.list.make('#contactlist', false, true);
    myContactList.setModal('#contact-modal', true, function () { // NEW
        this.setTitle('New contact');
        this.element.find('a.remove').hide();
    }, function (formObject) { // EDIT
        var contactId = formObject.getInputValue('id');
        this.setTitle('Edit contact #' + contactId);
        this.element.find('a.remove').show();
    });
</script>
TUTORIAL PART 4: contactlist.php, jQuery remove events handler
<script>
    var myContactList = znetdkMobile.list.make('#contactlist', false, true);
    myContactList.setModal('#contact-modal', true, function () { // NEW
        this.setTitle('New contact');
        this.element.find('a.remove').hide();
    }, function (formObject) { // EDIT
        var contactId = formObject.getInputValue('id');
        this.setTitle('Edit contact #' + contactId);
        this.element.find('a.remove').show();
    });
    // Click remove link events handler
    $('#contact-modal a.remove').on('click', function (event) {
        event.preventDefault();
        znetdkMobile.messages.ask('Confirmation', 'Remove this contact?', null, function (isYes) {
            if (isYes) { // OK to remove
                var myForm = znetdkMobile.form.make('#contact-modal form'),
                        contactId = myForm.getInputValue('id');
                znetdkMobile.ajax.request({
                    controller: 'contactctrl',
                    action: 'remove',
                    data: {id: contactId},
                    callback: function (response) {
                        if (response.success) { // Removal succeeded
                            // Modal dialog is closed
                            var myModal = znetdkMobile.modal.make('#contact-modal');
                            myModal.close();
                            // The list of contacts is refreshed
                            myContactList.refresh();
                            // The removed contact message is displayed
                            znetdkMobile.messages.showSnackbar(response.msg);
                        } else { // Removal failed
                            // Error message directly displayed in the form
                            myForm.showError(response.msg);
                        }
                    }
                });
            };
        });
    });
</script>
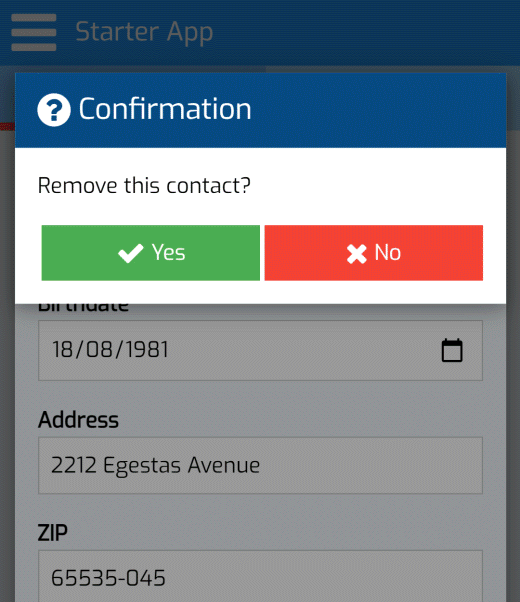
When the HTML link is clicked, the user is asked for confirmation before deleting the contact, by calling the znetdkMobile.messages.ask() method.
If the user confirms the removal, then the remove action of the contactctrl controller is invoked via an AJAX call using the znetdkMobile.ajax.request() method.
The identifier of the contact to remove is read from the id hidden input field through the znetdkMobile.form.getInputValue() method.
Once the deletion succeeded, the modal dialog is closed (see znetdkMobile.modal.close()), the list of contacts is refreshed (see znetdkMobile.list.refresh()) and finally a snackbar message is displayed to notify the user (see znetdkMobile.messages.showSnackbar()).
Otherwise, if an error occured, the error message is directly displayed in the input form by calling the znetdkMobile.form.showError().
The controller - Deleting the contact in the database
TUTORIAL PART 4: contactctrl.php, action for removing a contact
static protected function action_remove() {
    $request = new \Request();
    $dao = new \SimpleDAO('contacts');
    $contactsFound = $dao->getRowsForCondition('id = ?', $request->id);
    $response = new \Response();
    if (count($contactsFound) === 1) {
        $dao->remove();
        $response->setSuccessMessage(NULL, "Contact '{$contactsFound[0]['name']}' removed.");
    } else {
        $response->setFailedMessage(NULL, "Contact #{$request->id} does not exist!");
    }
    return $response;
}
First, the identifier of the contact to remove is read through a \Request() object.
Next, a \SimpleDAO object is instantiated and used to select in the contacts table the row matching the specified identifier (see \SimpleDAO::getRowsForCondition()).
If one row is found, the row is removed by a call to the \DAO::remove() method.
In case of error, the error message directly displayed in the input form is returned in JSON format through the \Response::setFailedMessage().
Going further
Downloading source code
The full source code presented in this tutorial can be downloaded as a zip archive named zdk4m-tuto-contacts.zip from the Download page.
If you have any question or comment about this tutorial, please post a message on the official ZnetDK Forum.
Reading more documentation
To learn more about formatting views with W3.CSS, I invite you to visit the W3.CSS Tutorial page.
For a full documentation of the ZnetDK Framework methods used in this tutorial, please visit the Documentation pages on this website.
If any documentation is missing, fill free to post a message on the official ZnetDK Forum.